
Getting started

What is squido?
squido is a dead simple static website builder which can be hosted anywhere for super fast websites and very little effort.
The idea is to be a no-code setup and have everything you need to run and host a website. You simply do the writing and customization of style and layout.
Installation
Simply install the squido cli module globally in order to build and manage your static site.
From Github (preferred for latest version)
$ npm i -g https://github.com/mrvautin/squido.git
From npm
$ npm install -g squido
With Yarn
$ yarn global add squido
Start from default blog setup
Make your squido website directory:
$ mkdir my-squido-website
Enter your new squido website directory:
$ cd my-squido-website
Setup a new squido website from defaults
$ squido new
Start from scratch
Make your squido website directory:
$ mkdir my-squido-website
Enter your new squido website directory:
$ cd my-squido-website
Get started building your squido website structure.
Start from template
The example we will use below is our blog example. There is also a documentation website example you can use.
$ git clone https://github.com/mrvautin/squido-blog-example my-squido-website
Replace my-squido-website with your new website directory name
Enter your new squido website directory:
$ cd my-squido-website
Run the following command to build, clean, serve and watch for changes:
$ squido serve -b -w -c
You can then visit your website here:
http://localhost:4965
Clean= removes everything in your/builddirectory.
Serve= starts a web server so you can view your website.
Without Git
Whilst it's best and easiest (depending on the user) to use squido with Git to manage deployment and source control. If you don't want to use Git you can use our Post Build tasks to easily deploy and manage your website.
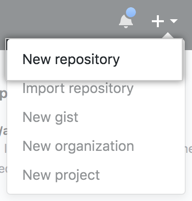
Create Git repository
- Create repository:
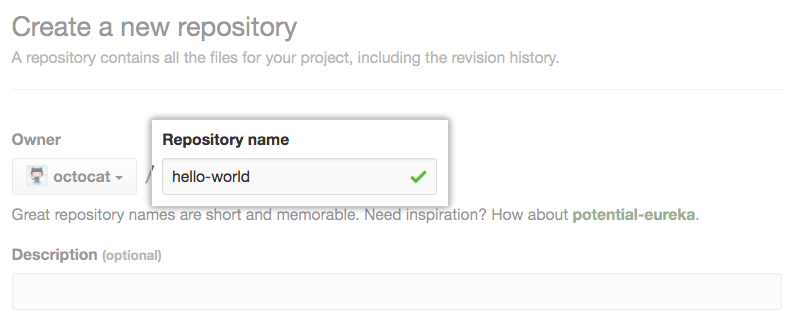
- Set the repository name:
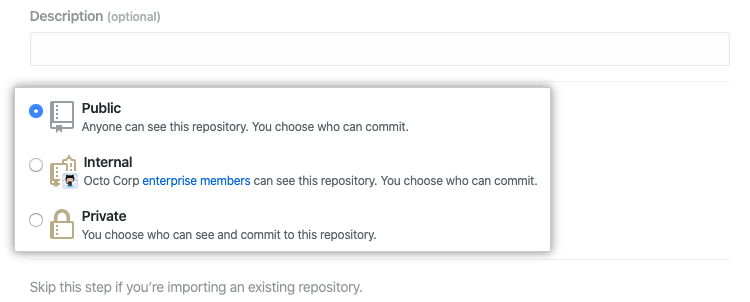
- Set public/private:
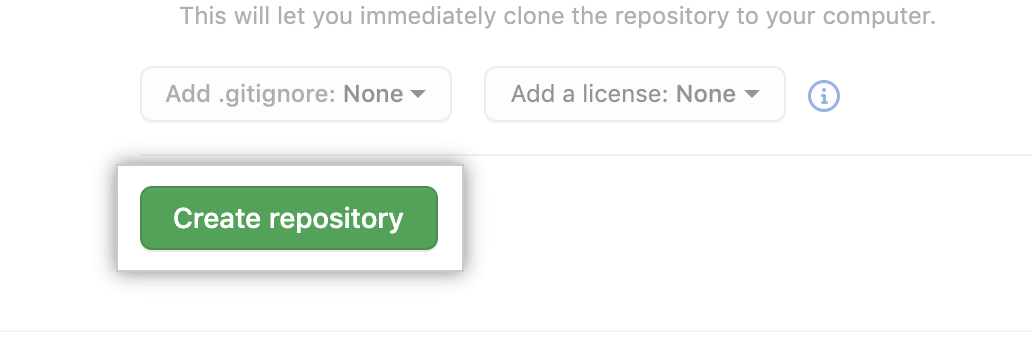
- Finish creating the repository:
- Add your new repository to your git remotes:
$ git remote add origin https://github.com/user/repo.git
- Check remote is correctly added:
$ git remote -v
# Verify new remote
> origin  https://github.com/user/repo.git (fetch)
> origin  https://github.com/user/repo.git (push)
- Create your first post:
/source/posts/hello-world.markdown
---
title: Hello World
permalink: hello-world
description: Hello World
date: '2021-03-10 01:59:00'
---
- Add your new files to first commit:
$ git add .
- Commit your files/changes:
$ git commit -m "First commit"
- Push your changes to your repository:
$ git push
Setup the deploy/hosting.
Demos
Blog style: https://squido-blog.markmoffat.com
Documentation style: This website
Traditional website: https://squido.markmoffat.com